For this class the aim is to use an « Arduino Genuino Uno » and understand how that work. So we realize a tutorial, we had to make a circuit that turns on and off a emitting diode.
To make the tutorial we use the software Arduino IDE, Arduino Genuino Uno, LEDs and electronic stuff such as electric link, button, grid etc.
- The first step was learn about « Arduino Genuino Uno » and how it works. It’s a microcontroller and that simplifies the making of connected electrical circuits. We could use microcontroller for interact with circuit and diffrent captors. For interact with « Arduino Genuino Uno », we have connected it at the USB link to our computer.
- The second part, focus on Arduino IDE. After Open the software and connected by USB. we want be sure the Arduino device are detected, so we have to do two things. First choose the Arduino version that is used at Tools to Board to Arduino Genuino. Uno. And the second select the good computer port from to Tools to Port. After this, we have build the electronic circuit, with 1 LED, some electic link and one grid.
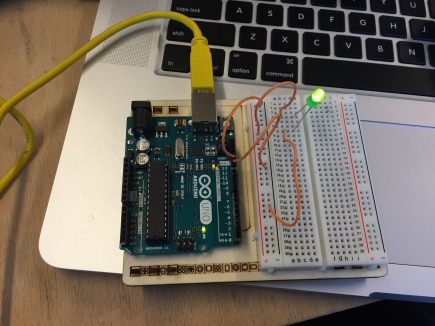
Basic circuit
- We have made a code, for blink the LED in the IDE, for that we have use this documentation. And we arrive at this result you can see below.
void setup() {
// we will use pin 13 as an output.
//Use for put a voltage on the pin to turn on the LED.pinMode(13, OUTPUT);
}void loop() {
//Main codedigitalWrite(13, HIGH); // turn on the LED
delay(1000); // wait 1000 millisecond
digitalWrite(13, LOW); // turn off the LED
delay(1000); // wait 1000 millisecond
}
- After tutorial, we made experiment, i have tried to augment the circuit for that i had 2 LEDs. I connected their at two other entrances and use time for playing with light.
void setup() {
// put your setup code here, to run once:
pinMode(13, OUTPUT);
pinMode(12, OUTPUT);
pinMode(11, OUTPUT);
}void loop() {
digitalWrite(13,HIGH);
delay(1000); // wait 1000 millisecond
digitalWrite(12,HIGH);
delay(500); // wait 500 millisecond
digitalWrite(12, LOW);
delay(750); // wait 750 millisecond
digitalWrite(11, HIGH);
delay(1500); // wait 1500 millisecond
digitalWrite(13, LOW);
delay(1000); // wait 1000 millisecond
digitalWrite(11, LOW);
delay(1000); // wait 1000 millisecond
